Lawn Fawn Turtle Card

Good Morning! Hope everyone had a great weekend! Our weather was beautiful here. If you have seen my posts on Mondays you know I'm a big fan of Lawn Fawns so it won't come as a surprise that I made a card this week using Lawn Fawn. 


I used the Magic picture changer die I love all of the different ways you can use it for changing pictures I will for sure be using this die many times. I have so many different ideas floating around in my head. For this first card with this die I used the Get well before-n-afters stamp set.  


This little turtle stuck on his back is so cute. 


I stamped the turtle and then masked him to ink the background I added ink in a hill shape and inked a blue sky. For a little interest I stamped some clouds in the sky.


Well when I stamped the turtle standing on his feet I didn't realize it but I stamped him a little high up so I just went with it. I added some flowers on the hill. 


I like the sentiment "Hope you're back on your feet soon" it's cute and can be used for many reasons. 


Thanks for stopping by and hope you have a great Monday!
~Crystal 

Happy Belated Birthday, Gnome Style!

Morning Crafty friends!
Today I am bringing you a super fun and interactive slim line card using a few of the Lawn Fawn stamp sets from Kraftgali!  I used the Oh Gnome, Llama, & Rain or Shine stamp sets from Lawn Fawn.


I started the base of my slim line card by trimming a piece of 8 1/2 x 11 thick white cardstock to an
8 1/2 x 3 1/2 base.  I used the left over piece to trim to fit on the front! This size fits perfect in a 9A envelope even with the extra thickness of pop dotting!

On the front piece, I inked the top half with tumbled glass oxide ink and die cut the stitched notch from the Lawn Fawn pull tab die.  Next, I die cut the grass out of green pattern paper to create the two layers, gluing the back layer down.


I stamped all the gnomes, flowers, quote bubbles, llama, and clouds, colored with copic markers, and fussy cut out.  I set them aside other than the sitting gnome and the present and added them to the pull tab with glue dots through the die cut notch on the card front.  I also die cut the arrow flap and glued to the trimmed pull tab.


Now that I finished the interactive piece, I laid out all my colored images and then pop dotted and glued to give a lot of depth to the front.  To finish the card, I stamped the sentiment on leftover thick white cardstock, trimmed, and pop dotted along the center bottom.  I love that the slim line card could fit this sentiment all on one strip!

Thank you for stopping by and I hope to see your creations on Kraftgali Fan Club on Facebook!  Also, take some time to see all the top brands in the Kraftgali shop!

See you here next Thursday for some more inspiration!
Candice

Thank You Cards for a Gift

Hi crafty friends! 

I'm back again this Monday playing with Avery Elle's Cool Treats Stamp setThis week I made a set of thank you card which I think would be perfect to give to a friend.

I started by stamping the middle image onto watercolor cardstock and masked the middle one off and stamped the two sides and then masked them and stamped the last two on the side. I did the same for all four cards but did stamped them all differently. I water colored them all in and then fussy cut them out. 


I used some old scrapbook paper and stamped "Thank You" towards the top and "You're so sweet" towards the bottom.


I adhered the treats in the middle of the sentiments with foam tape.


Then matted the pattern cardstock with the sentiments and treats onto more pattern paper.


Lastly I adhered everything to a top fold 5 1/5" X 4 1/4" card base. 


I placed a envelop behind every card and tied a ribbon around the stack of cards with a big bow on the front.


Now the Thank you card set is all ready to give to a friend. 


Thank you for stopping by today. Hope you have a great week and I will see you again next Monday!
~Crystal 

Lawn Fawn Happy Trails


Hello everyone!  Today's project is using this absolutely adorable set from Lawn Fawn called Happy Trails!  Although this scene card might seem complicated, it came together very quickly.  With a little bit of ink blending, and some coloring of these great images, this "bon voyage" themed card is perfect for someone headed out on a road trip.  Check out the video for a step by step on how to put it together.  Thanks so much for stopping by!


Lawn Fawn Let's Toast Anniversary Card

Welcome Friends!
Today I went back to one of my favorite stamp sets, Lawn Fawn's Let's Toast stamp and die set, and created this fun anniversary card.


The slim line card is a perfect size to add lots of the images and sentiments from the Let's Toast stamp set.  For my slim line cards I use one 81/2 x 11 sheet of thick cardstock and trim to make a 31/2 x 81/2 base.  This gives you enough left over to use as your piece on the front of the card!  It also fits into the size 9 envelopes!
I started my card by die cutting three stitched circles on the front white piece making sure there was space to add my sentiments banners and added to the card with pop dots.  I die cut three more stitched circles from watercolor paper for easy blending when I ink them.


The top section I stamped the toast and avocado, colored with copic markers, and die cut with the coordinating dies.  I added a green heart with mowed lawn oxide ink.  I then inked the stitched circle with mowed lawn and shabby shutters and stamped the You're and glued inside the circle.  I added the toast and avocado with pop dots.


For the middle section, I inked the stitched circle with dusty concord and milled lavender oxide inks and stamped the You're sentiment gluing to the card.  Next, I stamped the two toasts, colored with copic markers, and die cut out with the coordinating dies.  The hearts I stamped in dusty concord and tea dye oxide inks.  I then pop dotted the two toasts.


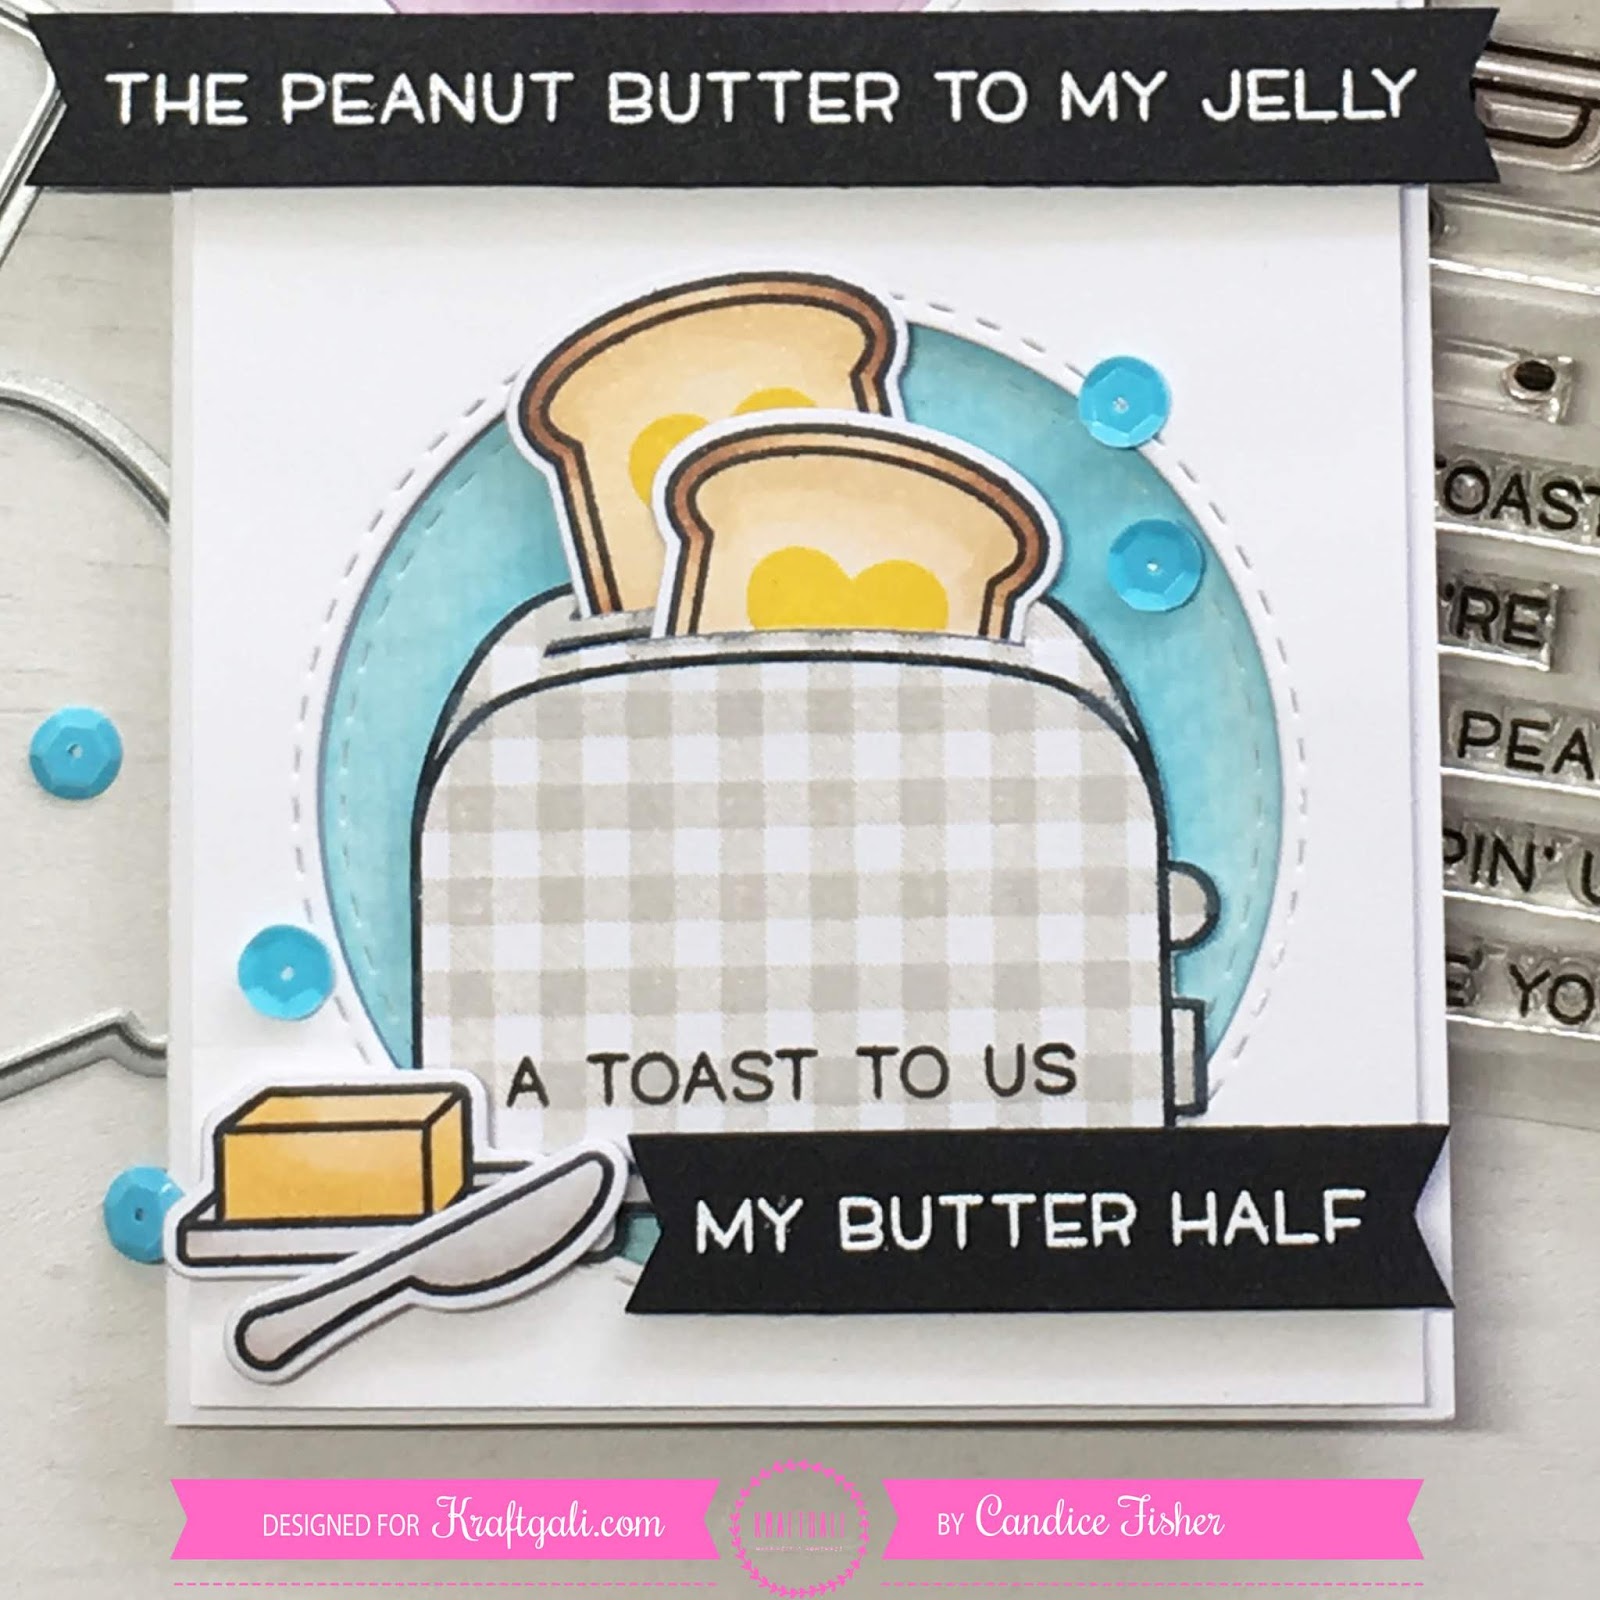
For the bottom circle, I inked the stitched circle with tumbled glass and broken china and glued to the card.  I then stamped the gingham pattern with pumice stone and stamped the toaster and fussy cut out to give it a sharper edge.  I then stamped the sentiment onto the bottom of the toaster and die cut the slits for the toast.  Next, I stamped the two toasts, colored with copic markers, die cut out with the coordinating dies, and stamped the hearts with mustard seed oxide ink.  I glued the toasts through the slits and then pop dotted the whole toaster on the circle.


To finish the card, I trimmed some thick black cardstock to fit the sentiments, stamped with versamark ink and heat embossed in white embossing powder, trimmed the edges and pop dotted below the circles.  I then stamped the butter and knife, colored with copics, die cut with coordinating dies and pop dotted next to the banner.  For the final touch, I added sequins in blue, purple, and green.

I would love to see your slim line cards, please share with us on the Kraftgali Fan Club on Facebook and come visit the Kraftgali store to see what is new!

Thanks for visiting and see you next Thursday!
Candice