Showing posts with label Heat Embossing. Show all posts

Heat Embossing 101

Ever wondered how to add gorgeous texture to your crafts? Stylish embossing is something you can achieve at home, with just a few crafty essentials!


Embossed designs are produced using your favorite stamps, plus a special ink, and special powder.  Once the designs are stamped in the ink, the area is covered with embossing powder, which melts when heated to create a wonderfully embossed finish! It’s a great technique utilized by paper crafters everywhere.

-- LINKS TO PRODUCTS USED --
These are the main supplies used, a similar product is linked where needed. Affiliate links used at no cost to you.

  1. Stamp Set of your choice - https://amzn.to/32Gfr5k (Link to the one I'd recommend.)
  2. Embossing Ink - https://amzn.to/2AhN5SJ
  3. Clear Embossing powder - https://amzn.to/2Ndxdcd
  4. Colored Embossing powder - https://amzn.to/2LssD84
  5. Heat Gun - https://amzn.to/32xuiPo


Other supplies used -

      6. Acrylic Block - https://amzn.to/2AhPDQN
      7. White Cardstock - https://amzn.to/2NczViq

Let’s look at the process:

Step 1:
Ink your stamp with embossing ink, then stamp onto cardstock. You can use embossing ink, or pigment stamping ink—both are slow-drying. I will be showing both - clear powder on black pigment ink & colored powder on clear embossing ink.
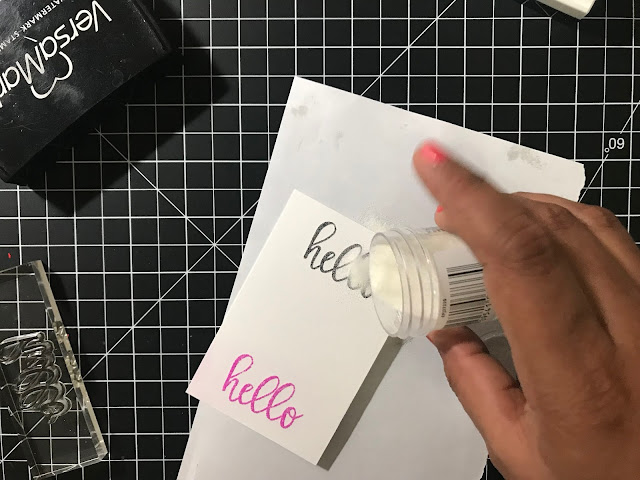


Step 2:
Place the stamped piece onto scrap paper. Immediately sprinkle embossing powder onto the image. You’ll want to work quickly, while the ink is still wet. You can be generous with the embossing powder!


Step 3:
Tap off the excess embossing powder. Return excess powder to the jar.


Step 4:
Use a heat tool to melt the embossing powder. Turn the embossing tool on, then warm it up for few seconds before using it on your project. Place the stamped piece onto a heat-resistant surface like wood, a glass mat or craft sheet, then move heat slowly over the embossed piece. You’ll see the powder melting and becoming raised and shiny. Take care not to overheat the piece.

Keep the jar of powder away from heat tool to avoid powder blowing everywhere!


Please comment below if you have any questions! Let me know if you'd like to see more quick How-to like these.

Princy
xo

Sunny Studios Devoted Doggies Valentine's Day Card

Hello Crafty Friends - Annie here with a cute Valentine's Day Card.

So, if your family is anything like mine when it comes to our pets - we celebrate everything with them. As we feel they are a part of our family. We give them cards and have them give cards.

I created this card for my husband from our sweet 1.5 years Pitbull named Echo. 
He is super loving and just adores my husband - as much as my husband adores him.

I used Sunny Studios Devoted Doggies Stamp set to create the card. 

I colored one of the doggies to look like our Echo. I also used the dog bone and paw print to create a heart.  Then, I die cut inside the bone and paw heart. Popped up the front panel and backed it with dark red cardstock. I popped up the little doggie in the center of the heart. Stamped the sentiment onto medium gray cardstock - heat embossed it with white embossing powder. Finally, stamped a few more paw prints and for a finishing touch add a few red sequin hearts.


I hope you give Sunny Studios Devoted Doggies Stamp set  a try!

I would like to thank you for stopping by the blog today.

There is so much more to discover in the store so don't hesitate to stop in and check it out. Also, check out the Kraftgali Fan Page on Facebook, on Pinterestand on Instagram to connect with other Kraftgali fans and share your work.  Have a crafty day!

Lawn Fawn's bookmarks for kraftgali card challenge #3 by Noga Shefer


Hi Crafty Friends! I’ts Noga and today I'm here to share a bookmarks for Kraftgali card  challenge #3!!


This is the front side  


This is the back side


The first elephant were stamped from the stamp set slow down and enjoy Stamps - Lawn Fawn
on smooth white cardstock using Jet Black Ink, colored in with Copic Markers C00, C0, C1, C3, R00 and R20.


The second elephant were stamped from the stamp set slow down and enjoy Stamps - Lawn Fawn
on smooth white cardstock using Jet Black Ink, colored in with Copic Markers W00, W0, W1, W3, R00 and R20.


The base of the bookmark was cut from perfectly plaid rainbow petite paper pack papers. now available perfectly plaid spring petite paper pack Papers - Lawn Fawn .      


The sentiment was stamped with a greeting from the stamp seslow down and enjoy Stamps - Lawn Fawn with versamark ink and was embossing with WOW! Embossing Powder Ultra High 15ml Opaque Bright White .


I cut the elephants using slow down and enjoy - lawn cuts Dies - Lawn Fawn and glue all the parts together.


I will be happy to hear which bookmark is your favorite!


Happy crafting :)

XOXO

Noga.

A card for Kraftgali spring challenge by Noga Shefer

Hi Crafty Friends! I’ts Noga and today I'm here to share a card for Kraftgali spring challenge!!


The base of the cards was cut from white cardstock using the frame die from Outside in stitched rectangle stackables Dies - Lawn Fawn .


the sheeps were stamped from the stamp set Missing Ewe Stamps - Sunny Studio Stamps on smooth white cardstock using Jet Black Ink, colored in with Copic Markers 0, W0, W1, E000 and R20.

The grass and sky were colored with distress oxide inks using Tim Holtz Distress INK BLENDING TOOL 1" ROUND Ranger


For this project I used:


Get yours at kraftgali now!


Happy crafting :)


xoxo


Noga Shefer


A baby girl card by Noga Shefer


Hi Crafty Friends! I’ts Noga and today I'm here to share a baby girl card.


I stamped Concord and 9th Polka Dot Turnabout Stamps two times with Tim Holtz tattered rose Distress Oxide Ink and Tim Holtz aged mahogany Distress Oxide Ink from the new bundle - Tim Holtz Distress Oxide NEW Ink Pads BUNDLE OF 12 .


The base of the cards was cut from white cardstock using the frame die from Frames & Flags Die Set - Newton's Nook Designs .


To create the circle, I use a heart die cut from  Outside in stitched circle stackables dies - Lawn Fawn  


The sentiment was stamped with a greeting from the stamp set Birthday Balloon Stamps- Sunny Studio Stamps

with Tim Holtz aged mahogany Distress Oxide Ink Pad and was embossing.


The baloon was stamped with a stamp from the stamp set Birthday Balloon Stamps- Sunny Studio Stamps in 2 layers: first layer - UNICORN White-HERO HUES PIGMENT Stamp Pad  ,second layer:  Tim Holtz tattered rose Distress Oxide Ink Pad from the new bundle Tim Holtz Distress Oxide NEW Ink Pads BUNDLE OF 12 and was covered with Glossy Accents.


Happy crafting:)

XOXO

Noga Shefer

A birthday card with new sunny studio stamps by Noga Shefer

Hi Crafty Friends! I’ts Noga and today I'm here to share a birthday card.


The base of the cards was cut from light blue cardstock using stitched cloud backdrop landscape frame die from Lawn Fawn.

The sentiment was stamped with a greeting from the stamp set Birthday Balloon Stamps- Sunny Studio Stamps and was embossing with white embossing powder.

the sheep was stamped from the stamp set Missing Ewe Stamps - Sunny Studio Stamps on smooth white cardstock using Jet Black Ink, colored in with Copic Markers 0, W0, W1, E000 and R20.


The baloon was stamped with a stamp from the stamp set Birthday Balloon Stamps- Sunny Studio Stamps in 3 layers: first layer - UNICORN White-HERO HUES PIGMENT Stamp Pad  ,second layer:  Tim Holtz Distress Oxide Ink Pad worn lipstick and the last layer
Tim Holtz Distress Oxide Ink Pad picked raspberry.
 
Tim Holtz Distress Oxide NEW Ink Pads BUNDLE OF 12 are available now.


XOXO

Noga Shefer