Ever wondered how to add gorgeous texture to your crafts? Stylish embossing is something you can achieve at home, with just a few crafty essentials!

Embossed designs are produced using your favorite stamps, plus a special ink, and special powder. Once the designs are stamped in the ink, the area is covered with embossing powder, which melts when heated to create a wonderfully embossed finish! It’s a great technique utilized by paper crafters everywhere.
-- LINKS TO PRODUCTS USED --
These are the main supplies used, a similar product is linked where needed. Affiliate links used at no cost to you.
Other supplies used -
6. Acrylic Block - https://amzn.to/2AhPDQN
7. White Cardstock - https://amzn.to/2NczViq
Let’s look at the process:
Step 1:
Ink your stamp with embossing ink, then stamp onto cardstock. You can use embossing ink, or pigment stamping ink—both are slow-drying. I will be showing both - clear powder on black pigment ink & colored powder on clear embossing ink.
Step 2:
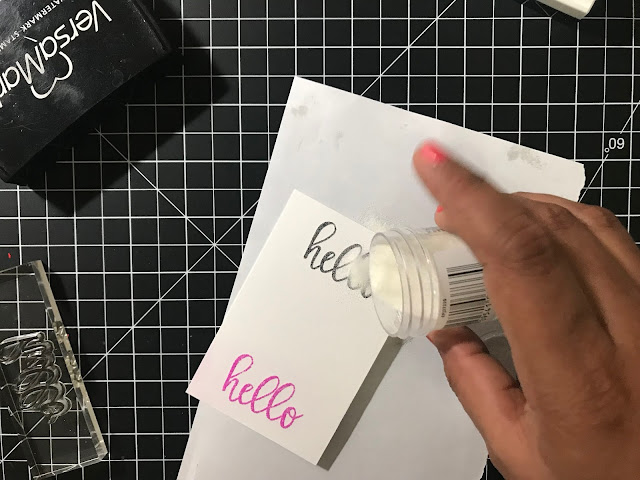
Place the stamped piece onto scrap paper. Immediately sprinkle embossing powder onto the image. You’ll want to work quickly, while the ink is still wet. You can be generous with the embossing powder!
Step 3:
Tap off the excess embossing powder. Return excess powder to the jar.
Step 4:
Use a heat tool to melt the embossing powder. Turn the embossing tool on, then warm it up for few seconds before using it on your project. Place the stamped piece onto a heat-resistant surface like wood, a glass mat or craft sheet, then move heat slowly over the embossed piece. You’ll see the powder melting and becoming raised and shiny. Take care not to overheat the piece.
Keep the jar of powder away from heat tool to avoid powder blowing everywhere!
Please comment below if you have any questions! Let me know if you'd like to see more quick How-to like these.
Princy
xo

Embossed designs are produced using your favorite stamps, plus a special ink, and special powder. Once the designs are stamped in the ink, the area is covered with embossing powder, which melts when heated to create a wonderfully embossed finish! It’s a great technique utilized by paper crafters everywhere.
-- LINKS TO PRODUCTS USED --
These are the main supplies used, a similar product is linked where needed. Affiliate links used at no cost to you.
- Stamp Set of your choice - https://amzn.to/32Gfr5k (Link to the one I'd recommend.)
- Embossing Ink - https://amzn.to/2AhN5SJ
- Clear Embossing powder - https://amzn.to/2Ndxdcd
- Colored Embossing powder - https://amzn.to/2LssD84
- Heat Gun - https://amzn.to/32xuiPo
Other supplies used -
6. Acrylic Block - https://amzn.to/2AhPDQN
7. White Cardstock - https://amzn.to/2NczViq
Let’s look at the process:
Step 1:
Ink your stamp with embossing ink, then stamp onto cardstock. You can use embossing ink, or pigment stamping ink—both are slow-drying. I will be showing both - clear powder on black pigment ink & colored powder on clear embossing ink.
Place the stamped piece onto scrap paper. Immediately sprinkle embossing powder onto the image. You’ll want to work quickly, while the ink is still wet. You can be generous with the embossing powder!
Step 3:
Tap off the excess embossing powder. Return excess powder to the jar.
Use a heat tool to melt the embossing powder. Turn the embossing tool on, then warm it up for few seconds before using it on your project. Place the stamped piece onto a heat-resistant surface like wood, a glass mat or craft sheet, then move heat slowly over the embossed piece. You’ll see the powder melting and becoming raised and shiny. Take care not to overheat the piece.
Keep the jar of powder away from heat tool to avoid powder blowing everywhere!
Please comment below if you have any questions! Let me know if you'd like to see more quick How-to like these.
Princy
xo


